Monday, 25 January 2010
My Final Stop Motion (with sound and edited)
This video is an improved one from the last. I have added a soundtrack and extended it by added a division screen. I feel this has been improved and advanced to a better standard.

Tuesday, 5 January 2010
Monday, 4 January 2010
How I did my Stop Motion Animation
For our stop motion we had to use our own photos, and animate them. For my background I used a Hockney style joiner photo-montage, which made it very abstract and surreal. I chose my background which was a road and path. I then took a series of pictures in a panoramic view and 'joined' them together. I then moved my individual pictures across my background and with each movement, I took a freeze frame of that in Adobe Premiere, and it then automatically put all the frames together to create a video clip (an avi file), which then can be edited later on.
In my case I made my original animation, then realised it was too short so I had to take some more frames, which created a problem. I had to fit the two clips together, so I zoomed in on the time line where the first clip was, I selected the point where I wanted to split the clip and executed it. I then dragged the second clip into the middle of the first and they fitted together to form a longer clip which, I feel is better than the original as it isn't too short and gives the viewer more of a chance to see the different stages and techniques used to create it.
In my case I made my original animation, then realised it was too short so I had to take some more frames, which created a problem. I had to fit the two clips together, so I zoomed in on the time line where the first clip was, I selected the point where I wanted to split the clip and executed it. I then dragged the second clip into the middle of the first and they fitted together to form a longer clip which, I feel is better than the original as it isn't too short and gives the viewer more of a chance to see the different stages and techniques used to create it.
Tuesday, 8 December 2009


Wednesday, 2 December 2009
Examples of Stop Motion
Here some more examples of stop motion animation, these are very complex and effective.
Here some more examples of stop motion animation, these are very complex and effective.
Here some more examples of stop motion animation, these are very complex and effective.
Monty Python Animation
This is an example of Monty Pythons stop motion animation, they use voices and music in the background to animate the pictures which on their own wouldnt mean anything. The videos are very effective and show good use of using pictures.
Wednesday, 25 November 2009
Proposal for Stop Motion
I have thought about what I could do for my stop motion animation.
I will have a Hockney style background image, and I will animate some objects in the photo, but because it is in the style of Hockney it will be very abstract. I will have a sun that goes across the scene, im not sure at the moment what object will be animated in the animation.
I will have a Hockney style background image, and I will animate some objects in the photo, but because it is in the style of Hockney it will be very abstract. I will have a sun that goes across the scene, im not sure at the moment what object will be animated in the animation.
Tuesday, 24 November 2009
Hockney Style Photomontage

I looked at some of David Hockney's 'joiner' pictures and I was inspired to create one of my own under the title 'Changing Landscape'.
I feel changing of landscape is the seasons changing therefore I found a tree near my house that had some of its leaves deep red and orange in colour, and also with some leaves dropped and surrounding the base of the trunk of the tree.
I took a series of photos of the tree from different angles and using the inspiration of Hockney I created a joiner picture that is shown on the left.
I was happy with the compostion of the photo and I made it so it was slightly not matched up making for a more abstract look.
However I started adding warming filters to it and they improved it greatly in my opinion, because the warming of the photo adds to the colours that are shown in the leaves.
Below is a screenshot of the filter being added to the picture:
 Below is the final picture after being warmed:
Tuesday, 17 November 2009
My Photomontage
I have now completed my photomontage, and it is shown below. First I took a picture of a carpark entrance in Southborough, near my school, and copied it to make it mirrored. This created a surreal feel to the image. I then scanned in images from bmx magazines of different bmx riders. Some of them were in colour and some were in black and white. This is similar to other work by Martha Rosler. My once I had put all the images i wanted in the picture which is shown below:
 I was happy with this as a final image but then I started to play around with the photo filters, and I added a warming filter to the image and it turned the sky a purple colour which I felt was a much more vivid colour. Below is the creenshot of the two together in photoshop:


I was happy with this as a final image but then I started to play around with the photo filters, and I added a warming filter to the image and it turned the sky a purple colour which I felt was a much more vivid colour. Below is the creenshot of the two together in photoshop: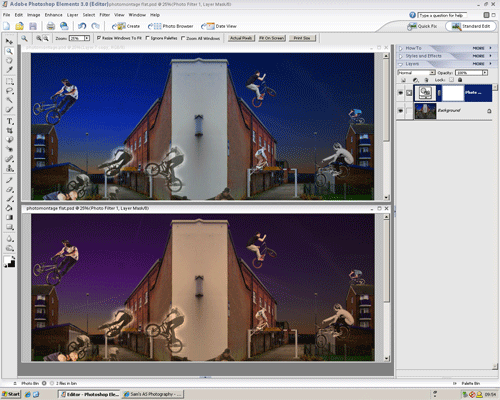
After I had changed the the filter that was on the picture i added two lens flares to the streetlights in the background and then i felt it was finished. The final photomontage, inspired by Martha Rosler's work, is shown below:

Wednesday, 4 November 2009
Proposal for Photomontage
My idea for my photomontage is to take a picture of one area, like a street, and place lots of different bmx tricks being perfomed in the picture. The background will have edited backgrounds, using images from magazines and my own photos.
I am inspried by Martha Rosler in the way that she uses different images and puts them together to make it look real but it still looks very abstract and out of perspective. I will do something similar to this but mine won't have a political message, it will just be the things I like.
I will take pictures of the background and use images from magazines to create the forground interest.
I am inspried by Martha Rosler in the way that she uses different images and puts them together to make it look real but it still looks very abstract and out of perspective. I will do something similar to this but mine won't have a political message, it will just be the things I like.
I will take pictures of the background and use images from magazines to create the forground interest.
I am inspired by this photo below by Martha Rosler where there are more than one of the same person in the photo. My photomontage will not be of the same person loads of times, but there will be lots of people on bmx's and there will be sequences of tricks involved in the image.

Tuesday, 3 November 2009
Martha Rosler

 Martha Rosler is an American artist who creates these quite, at a glance realistic, montages, but after looking at it further you can see the cleverness of how they are put together. She uses images from times when only black and white camera were used and modern photos, but the way she makes them interact is what I like about these images. There is also a mixture of of moods in the montages aswell as there is war-like scenes and models. This is a very surreal thing and it makes the images more in depth than they first appear.
Hannah Hoch

 Hannah Hoch is a german artist, who's work includes these photo montages, which I think are very effective as they incorporate a varying range of objects and people that don't really create anything in particular but they are very abstract and in some cases very surreal. I like them as they are very weird and the way the different things are put together is very clever.
David Hockney


David Hockney is an English painter, print-maker, stage designer and photographer. He creates photo montages like these. He takes various photos of one place and puts them all together to create these very abstract and distorted views of one particular place. I like these very much as they incorporate art and photography. They also are very abstract and give a very different view than a normal photo of one place.
Stop Motion Animation
 Stop motion animation is where individual photographs are taken of an object. In each photo the object has been moved slightly. Once all the pictures are put together the animation is very jerky and creates the effect that the object is moving. This can be very abstract as any object can be moved making stop motion animation a very arty form of animation. Sometimes clay figures are used in this animation as they can be repositioned easily and stories can be created using the models e.g. 'Morph'.
Wednesday, 21 October 2009
My Own Composition

 These are the pictures used to create my final image
 For this composition I did a very similar thing to the last post, however I had to crop the background image so that the picture was framed better.
Compositing an Image
 This photo is two photos put together to make one photo, this is composition. First I got the two separate images, the plane on its own and the rocky landscape.
1. First thing to do was to select the outside edge of the plane from its original background, which in this case was just plain white, which made it a lot more easier to select using the magic wand tool. After this I right clicked and inverted the selection so that the plane was just highlighted.
2. Then I contracted the selection so it was tidier, and to make it more of a realistic composition.
3. Then I copied the plane into the background image and began to change it to make it fit in, in a realistic way.
4. The first thing for this was to re size the plane so that it looked in proportion with everything else in the picture.
5. I then rotated it a bit so it didn't look like it was flying into the rock. Once I had done this I duplicated the layer, so I could add blur to the plane to create the speed.
6. I then, using the blur filter, added some motion blur to the plane. Then because I had duplicated the layer I could now rub out the front edge of the plane to make it look like it was traveling in one direction.
7. The next thing I had to do was to blur the background, once again using the motion blur, but this time I made the distance of the blur to 40pt instead of 15pt for the plane, this made the plane look like it was going faster.
8. The last thing i did was to create speed lines coming off the ends of the planes wings, I did this by selecting the areas I wanted and creating a new layer, then I filled the selection area with white and set the opacity to 20%. This created the final lines you can see in the picture.


These are the original pictures.
Tuesday, 13 October 2009
Changing Moods in Photos 2

 Once again i have edited this photo on the left to change the mood. However this time have created a darker, more scarier mood, by using a cooling filter (82) with a density of 26%. Then I felt that wasn't enough so I adjusted the brightness from 0 to -106. This created the very dark and somber mood present. Below are the two screen shots that changed the photo:

Changing Moods in Photos 1

 The photo on the left is one I took recently and I have used the an orange photo filter with an 87% density. The photo on the right is the finished one and it has a significant change to it. Adding the filter has changed the mood to a more warming and inviting one. Below is the print screen of the process:
Wednesday, 7 October 2009
Mosaic Filter


This filter was the mosaic filter which I chose when looking in the filter gallery. I applied it to the whole photo, with the cell size set to 13, the border thickness to 2 and the light intensity to 2. This type of filter breaks up the original lines that were in the picture and makes it more abstract.
Halftone Filter


This filter is the halftone filter which I chose from the filter gallery. I set the contrast to 20 and the size of the squares to 1, so that the picture still kept some detail. I had the foreground colour as a deep red and the background colour black, this has created a very horror type feel to the photo.
Subscribe to:
Posts (Atom)